Analyze your GitHub project for free with Azure DevOps and SonarCloud
I’ve blogged some weeks ago on how to analyze OS code with SonarCloud, but it is time to update the post, because if you want to use SonarCloud you have a dedicated extension in the marketplace.
Figure 1: Official SonarCloud extension in the marketplace.
One of the great feature of Azure DevOps is its extendibility, that allows people external to Microsoft to create extensions to expand the possibility of the tool. Once you’ve added the SonarCloud extension to your account, you have a whole bunch new build templates you can use :
Figure 2: Build template based on Sonar Cloud
Having a template make super easy to create a build, you just choose.NET Desktop with SonarCloud and you are ready to go. As you can see in Figure 2 you can also use Azure DevOps pipeline to build with Gradle, maven or.NET core, so you are not confined to microsoft tooling.
In Figure 3 there is the build created by.NET desktop project template (remember that this template can be used also for web application, and for every.NET application).
Figure 3: .NET Sonar Cloud analysis template.
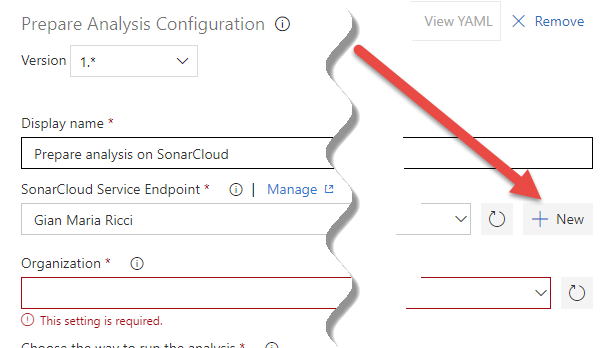
The only task you need to configure for Sonar Cloud analysis is the Prepare analysis on Sonar Cloud. As you can see in Figure 4 , you should first create an endpoint that connect Azure DevOps to your SonarCloud account.
Figure 4: In task configuration you have a nice button to create the connection to your SonarCloud account
Configuring the connection is really simple, just give a name to the connection and specify the access token (you should first generate a token in SonarCloud). Then, as shown in Figure 5 , press Verify Connection to check that everything is ok.
Figure 5: Configuration and test of the connection between Azure DevOps and SonarCloud.
Thanks to the concept of external services, you can configure one or more connection to SonarCloud and having it available in the build without disclosing tokens.
Once you’ve selected the connection, just specify name and key of the project, and other optional parameters if you need to do a custom analysis. In less than a couple of minutes you have a build up and running. Just configure the agent to use Hosted VS2017 pipeline and queue a first build to verify that everything is ok.
Once you have configured the build with the visual web designer, you can convert to Yaml build with few steps.
Clearly I prefer to have a YAML build for a lot of reasons, once the build is up and running simply press the YAML button in the build definition to have your build converted to YAML.
| |
Finally, if you still have not installed Azure Devops Pipeline in your GitHub account, I strongly suggest you to do so, just follow the instruction of this article, it is free and gives you free hosted pipelines to run your build for free.
Gian Maria


