Release a product composed by multiple projects and builds
Sometimes you have legacy projects with many solutions that compose a single product. In this scenario you want to build each solution separately but you also need a full release to build everything at the same point in time
Situation
We have a legacy project, born when Asp.Net WebForm was still a thing and Asp.NET MVC was still not released. This project grow during the years, in more that one subversion and git repositories. It was finally time to start setting some best practice in action and, to avoid complexity, we end with a single Git Repositories with six subfolders and six different solutions, each one that contains a part of the final product.
Even if we are in the era of microservices, sometimes it is just convenient having all solutions in a single repository, let’s see how to deal with this scenario for Azure Pipeline context.
Build only project that changes
We are still on the path of standardizing all the builds, but since some projects are full Framework, some other are in .NET Core, we end having six different YAML definitions, each one that builds a specific project.
Thanks to trigger branch filtering, we were able to implement continuous integration, but only if someone changes code inside specific path.
| |
In the above piece of YAML build, we impose a continuous integration on standard GitFlow branches, but since this build target a project called Connector , I’ve setup a path filter to include only changes in src/Connetor subfolder. With this configuration if someone changes other solutions of the repository, this build is not triggered. This is really important, because having six different projects and six different builds in the same repository, we will have six builds triggered at every push, even if only one project was really changed.
PowerShell build
Each build can be done with a different script/technique but essentially every build produces one or more artifacts and each artifact is a 7zip archive containing everything needed to release that specific project and has a name determined from GitVersion. GitVersion is a key part of the process because it will assure me a unique number for each commit.
To simplify the process, we created a simple PowerShell file that uses standard dotnet command line tooling to build / test / publish a project, this allows each developer to locally run build.ps1 script and have the very same result that you can have from Azure DevOps pipeline.
Reproducibility of a build in developer machine can be a nice properties of your Continuous Integration infrastructure.
| |
Using dotnet Core local tools strategy, we can simply use dotnet restore to use GitVersion and being able to run dotnet tool run dotnet-giversion and piping all the result to ConvertFrom-Json to extract all SemVerNumbers (line 2 and line 5).
Interact with DevOps Pipeline from PowerShell script
If build.ps1 script is executed inside a Azure Devops Build we want to interact with Pipeline engine to basically obtain two noticeable results
- Change name of the build using SemVer numbers
- Dump all environment variables (we use them a lot for testing DB etc)
To detect if the script is running in a Azure DevOps pipeline we can simply check the existence of environment variable BUILD_BUILDID.
| |
Code is really simple, outputting ##vso[build.updatebuildnumber] commands updates the build number. To dump environment variables or whatever information you need, just add a MarkDown file as attachment.
This simple technique allows to run portion of PowerShell script only in the context of a Pipeline.
Creating artifacts
Once tests run successfully we use dotnet publish command to publish every project that needs to be published, we use Semantic versioning and a simple function that download (if needed) and uses 7za.exe tool to compress result with 7zip
| |
Nothing really complex here, just publish and 7zipping everything in an archive that contains the version as returned from GitVersion.
For legacy projects not written in .NET core a simple MSBuild publish will practically does the very same thing.
Creating YAML Build
Once a complete build.ps1 script is in place, we can create AzDo pipeline composed by only four tasks.
- Install if needed .NET core with desired version
- Run script build.ps1
- Upload test results
- Upload artifacts
This is the whole build.
| |
Once this build runs it produces a nice output, with all tests result and published artifacts.
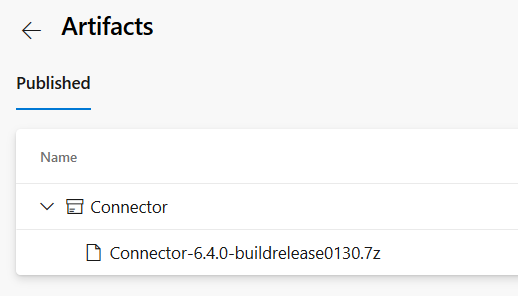
Figure 1: *Artifacts produced by Connector pipeline"
As you can see artifacts name is “Connector” and it contains a single file, a 7ip archive that contains everything needed to be released, as packed by build.ps1 script. Archive file name contains software version, this is a legacy requirement, that makes automation of release a little bit more complex, but is indeed nice to avoid version confusion.
Simplify release building every project for a full release
With this setup, if a developer pushes a change on one of the six projects only the corresponding pipeline gets executed, it runs tests and produces and publishes artifacts. All green.
Now we face another small problem, when we need to do a complete release, we wish to run all pipelines on the very same Git commit, creating all the packages at the same point in time. This requirement really simplify the deploy because:
- We can be sure that all released code comes from the same point in time
- Every assembly has the very same name
- We are minimizing the risk of deploy with mismatched version
When all the packages can be published at the same moment, with the very same number, deploy is simplified because you can simply update every project using the very same version number.
Now suppose Connector project was never changed (and never built) from version 6.2 to 6.3. In this scenario if we need to deploy 6.3 version of another service, we could teoretically use version 6.2 of Connector service, because it is not changed. This add complexity in the game, because you should check every pipeline to understand what is latest version of every service. To have a really simple installation, if you compile and publish everything at the very same commit, you can simply have a simple rule where you deploy every service with the very same number.
Simplicity always win over complexity
Creating a single release pipeline to publish every project
The obvious solution is create another pipeline automatically triggered on master branch (we release master branch as per GitFlow) that in turn triggers all the other six pipelines, grab artifacts and pack everything together. While this is indeed a simple approach it is annoying because in the end your release pipeline results is scattered in six distinct pipeline execution plus result of the orchestrating pipeline.
Thanks to MultiStage pipeline and templates, there is a better solution. Instead of having a YAML pipeline definition for each project, we created one template for each project with all the steps needed to compile/publish that project. The real final build contains trigger definition, specification of which pool to use and a simple reference to template file containing real steps.
| |
The definition does not include any real task, everything is contained in template file.
| |
Thanks to pipeline template, we can define the real sequence of steps to compile a project in a single file, then reuse that file in multiple pipelines.
We proceeded converting each of the six pipeline to template + pipeline format.
Creating the single release pipeline
At this point we have six template and six pipeline that uses those templates, so we can proceed with the creation of a single multi staged pipeline that triggers all templates one after another. At this point we have six template and six pipeline that uses those templates, so we can proceed with the creation of a single multi staged pipeline that triggers all templates one after another.
| |
In this first version the pipeline really has a single stage, but in the jobs section we can refer all six different templates. In previous listing in line 13-19 template for building Connector project is included. Then in line 21 template for OpcSimulator is also included, and this is done for every other template.
When the pipeline runs it will execute one after one all the jobs for all projects. In Figure 2 you can see the result after I included 5 projects in this final build.
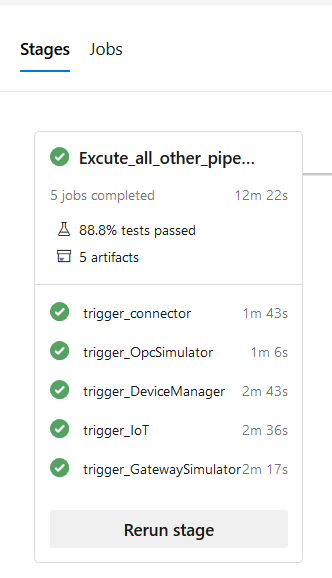
Figure 2: Multi stage pipeline result
Since each template takes care of its own artifacts publishing, at the end of the build I have all artifacts and test results in a single pipeline execution result with very little effort.
Having a single pipeline with multiple job is the best solution because we have multiple templates result in a single location.
The following picture will show artifacts section of pipeline execution result.
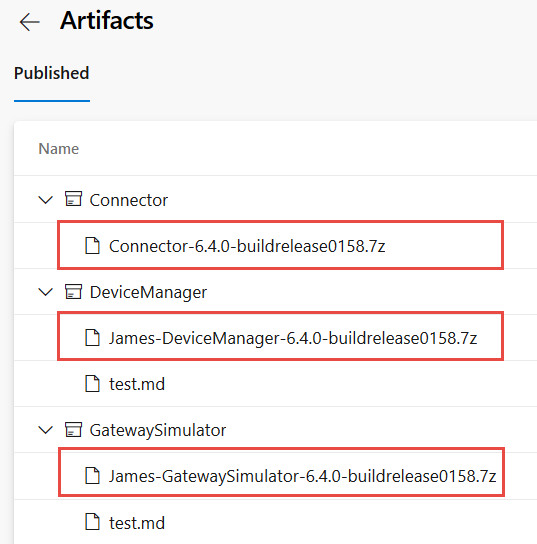
Figure 3: Multi stage pipeline artifacts result
Looking at Figure 3 you can notice that all projects are indeed compiled at the very same version, contained in archive name. This will completely avoid risk of deploying incompatible versions, we can always deploy all the services at a given version from a single pipeline output.
Using template approach gives us the following advantages
- The sequence of tasks needed to build/release a single project is defined only in a single place, the template.
- Reusing template in more than one pipeline gives us the ability to run the very same tasks sequence in multiple pipeline
- Avoiding the approach of a pipeline that triggers other pipeline saves us from using two licenses for each run (one for the orchestrating pipeline the other for triggered pipeline)
- Using a build with multiple jobs, we really have one single result page with result for every project run.
- We decoupled the what of the pipeline (sequence of tasks) from pipeline configuration (triggers, pool to use)
In the end we are satisfied with this solution and as always a great kudo to Azure DevOps team for the flexibility of pipeline engine.
Gian Maria.